Ultimate Guide: Master Patio Drip Irrigation
Advantages of Drip Irrigation
A patio drip irrigation system works quietly and obtrusively. It saves time, is easy to install, has optional kits or individual components. It helps your water conservation efforts because it is 90% efficient. No water evaporation. Meanwhile, your plants have access to the water at their roots for photosynthesis and to prevent disease. For all of your options, we created this ultimate guide to patio drip irrigation.
Planning Your Patio Irrigation System

Don’t jump in the car for components just yet. Planning your patio irrigation system needs a quick sketch of the plants and areas you want to cover. A drip irrigation system allows you to:
- conserves water since drip systems water a little every day instead of wasting water in run off.
- save time – you only have to turn on a spigot or if on a timer, do nothing at all.
- makes sure your plants don’t go through a drought.
You also have two choices depending on your level of confidence. You can either buy a drip irrigation kit that comes with almost everything you need (you may need a way to reduce water pressure) or buy the component separately after you draw out your design.
Draw Your Patio Irrigation Design
Some considerations are the location of the faucet and an outdoor electrical outlet if you plan on using a pump (with rain barrel collection) or automatic timer (some run on a battery). I suggest using graph paper and measuring the distance between plants, the water source, and the path of the hose. Making a sketch on graph paper will show you all of the obstacles and the design of your drip system.
Irrigation Design Considerations
Some things to consider are:
- Are you going overhead for hanging plants?
- Do you have concrete or pavers in the hose path?
- Is there a doorway to consider.
Parts of the the Patio Irrigation System
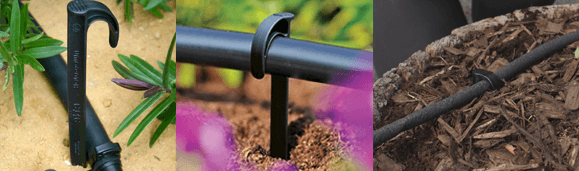
Before providing a list, there are a few things to define. The emitters are the plastic parts that drip water to your plants’ roots.
Types of Emitters
- For most soils use .6 gph (gallons per hour) (2 LPH Liters per hour) – turbulent flow emitters
- For sandy soil use 1 gph (4Lph) – turbulent flow emitters
- With steep elevation over 5 feet. (like haning baskets) use pressure flow emitters.
- For gravity flow system (like a barrel on a stand) use short path emitters.
How Many Emitters
You need 2 emitters per plant (in case one clogs up) depending on the size of the plant. Shrubs or trees need more. The leaf canopy size shows the size of the plant root system. You need emitters every 18″ under this canopy.
Backflow Valve
Drip emitters lay directly on the soil. It is important to have a backflow valve to prevent water contamination by soil-borne disease. If you are doing a commercial irrigation installation or large garden irrigation system, please read this guide on backflow valves. Also, you might check with your local building department for guidance. Small systems can use an atmospheric vacuum breaker or an anti-siphon valve. If you are unsure or have a larger irrigation system, you should ask yourself the following questions:
- Is this a commerical or residential install and at least 6″ above sprinkler or emitter?
- Commercial – install a reduced pressure backflow preventer.
- Residential – go to the next question.
- Do you plan to use fertilizer in the waterline?
- Yes, install reduced pressure backflow preventer
- No, go on to the next question.
- Do you want the backlow preventer to be installed below ground?
- Yes, install a double check backflow preventer
- No. go on to the next question.
- Can you install the valve at least 6″ above the ground and above the emitters for a reasonably small garden area?
- Use a 3/4″ Anti-Siphon Valve
- No, install a Pressure Vacuum Breker, Reduced Pressure Backflow Preventer, or Double Check Backflow Preventer.
Attach Connectors To Faucet
Start by attaching the backflow preventer onto your hose or outdoor spigot (it simply screws on). Next, you’ll attach the pressure regulator, and last the faucet fitting (this just screws on too – no tools needed!).
Basically, you’ll end up chaining the garden hose attachments together in this exact order (backflow preventer, pressure regulator, faucet fitting). Then, add one end of your 1/2″ poly mainline tubing, and push it into the open end of the faucet hose fitting. Once you’ve pushed it in, pull down the collar on the hose fitting piece, and tighten it to secure the tubing. Then, you will install drip tubing probably 1/4″ drip tube off of the mainline 1/2″ poly hose.
Drip Tube and Installation
The maximum length of the drip tube is 60 meters or about 180 feet from the point the water enters the hose until it exits the emitter. You can determine how long to make the mainline of 1/2″ hose and where to start the 1/4″ drip tubing. The emitters are attached to the 1/4″ drip tubing. Do not bury emitters underground since roots can clog the emitters. Also, cover the tube with mulch or bark but do not bury it as moles or gophers may chew through it.
Install or lay down the drip hose along the path of your design before using a hole punch (a pointed tool used to make holes in tubing) to cut the holes for the emitters. Make sure feeder lines go in 90-degrees, attached to the mainline, with the correct sized connectors. You can dip the hose into warm water to make it more flexible to insert the splicer into the hose. Don’t use lubricants. Once all emitters and splicers are in place, turn on the faucet to check that all of the emitters are working. Check that there are no leaks on the valves or at spliced connections. If everything is working properly, make sure to stake down the drip tubes.
1/4″ Spaghetti Drip Hose for Potted Plants
The 1/4″ distribution tube hose is great for running to the plants if they are in pots. It makes the tubing less obtrusive visually. Try to use as little 1/4″ distribution tube as possible. Keep the tube lengths short as much as possible, and only put 2 emitters on a single 1/4″ tube. If the tube is longer than 5 feet, use only one emitter on it. Staple the tubes to something to keep them in place. Don’t pull any of your tubes tight, snake them a little, leaving some slack in them to allow movement. The tubes will expand and contract with temperature changes, you don’t want them to tear or pop the fittings off.
Watering with a Drip Irrigation System
If you turn your drip system on manually at the spigot, water 2-3 times during the week for 10 minutes. Check the soil around the base of your plants and determine if it is too wet or too dry. If dry, leave the drip on for an additional 5 minutes and check again. If too wet, reduce the days per week. Normally, in cool weather, water 1-2 days a week, 2-3 days a week in mild weather, and 3-4 days a week in hot weather. Go through the same inspection if you have a timer at the spigot and determine the cycle. Check it for a week or two to make sure it is working properly. For more specific information regarding your plants’ requirements, contact your local nursery or the Agriculture Extension office in your area.
Equipment Needed
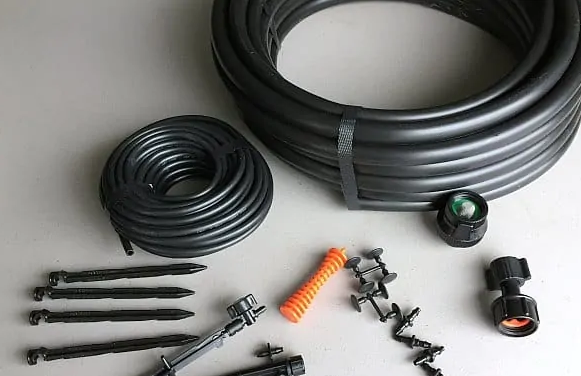
- Drip irrigation kit – This Raindrip Automatic Kit on Amazon waters 20 plants.
- Mainline drip irrigation hose (1/2″ poly drip irrigation tubing)
- Drip irrigation backflow preventer
- Garden hose connector (1/2″faucet fitting)
- Pressure regulator
- Poly tubing end cap
- Irrigation micro tubing (1/4″ vinyl)
- Irrigation drippers with spikes, one for each pot (we used these 360 degree adjustable drippers)
- Drip irrigation hole punch
- Line or hose connectors
- Tube irrigation spikes (1/2″ tubing stakes)
- Drip hose goof plugs (just in case)
- Garden watering timer for drip irrigation
- Garden hose splitter (optional, comes in handy if you want to hook up another hose to the same spigot)
Troubleshooting System Installation
- Cannot connect to water source. The size of the connectors are 3/4″. If you have 1/2″, you need to replace your fittings.
- Water not coming out of the tubing.
- Check for kinks in the tubing hose.
- Check that End plugs were installed correctly.
- Tubing may be clogged. Remove the end plug and flush the tubing hose then replace the end plug.
- Check for a clogged filter and the valve. If clogged, clean it and flush hose.
- There can not be more than 240 emitters on one zone. If there are, you must make a new zone from the initial feed valve or reduce the number of emitters.
- The End Plug or emitter blows off.
- Too much pressure, make sure you have a pressure reducer valve.
- The emitter or end plug was not installed properly.
- Wrong size fitting used.
- Lubrication oils were used to insert the emitter or end plug causing slippage. Clean with a de-greaser.
- Problems with leaks at fittings.
- Make sure the cuts are clean when cutting tubing, if not re-cut.
- Make sure fittings are inserted properly.
- Too much pressure, install a pressure reducer valve.
- Wrong size fittings used.
DIY Patio Drip Irrigation Solutions
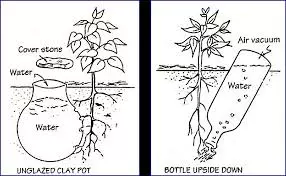
A clay pot can be buried next to each plant and filled with water. These are called ollas and have been used for more than 4,000 years. The clay allows the water to seep out the sides of the jar into the surrounding soil. Place a rock over the opening so amphibians or insects do not get inside. Or, if you use a buried clay pot, use the clay drainage tray upside down on the top of the pot as a lid.
A plastic pop bottle can also be buried upside down at an angle toward the roots of the plant. Holes can be burned in the cap of the bottle with a heat gun or leave the cap off. The bottom of the bottle can be cut off. Then, fill the bottle with water and cut a side split about a 1/2″ deep so you can squeeze the bottle and allow the bottom cup to be slipped back over the exposed end (as a new end cap) once the bottle is filled. These water containers can be filed once per week. Other ideas are PVC pipe with holes drilled along the pipe that is buried and filled with water. These may only make watering more convenient since the water will tend to seep out quickly.
Clever Consideration for Water Conservation

Although drip systems do decrease the amount of water used, water conservation is a good idea. If you have gutters on your roof and, ideally, a metal roof. You may decide to capture rainwater in a barrel or cistern system. There are many types which I will address in another post. However, having a barrel on a raised platform that catches rainwater, could make an ideal gravity-fed drip system or use a drip hose to carry water to buried ollas.
Let me know in the comments below if you use a drip system in your garden.
This post contains affiliate Links that will pay me a small commission if you click on it. Thank you advance for supporting my writing!